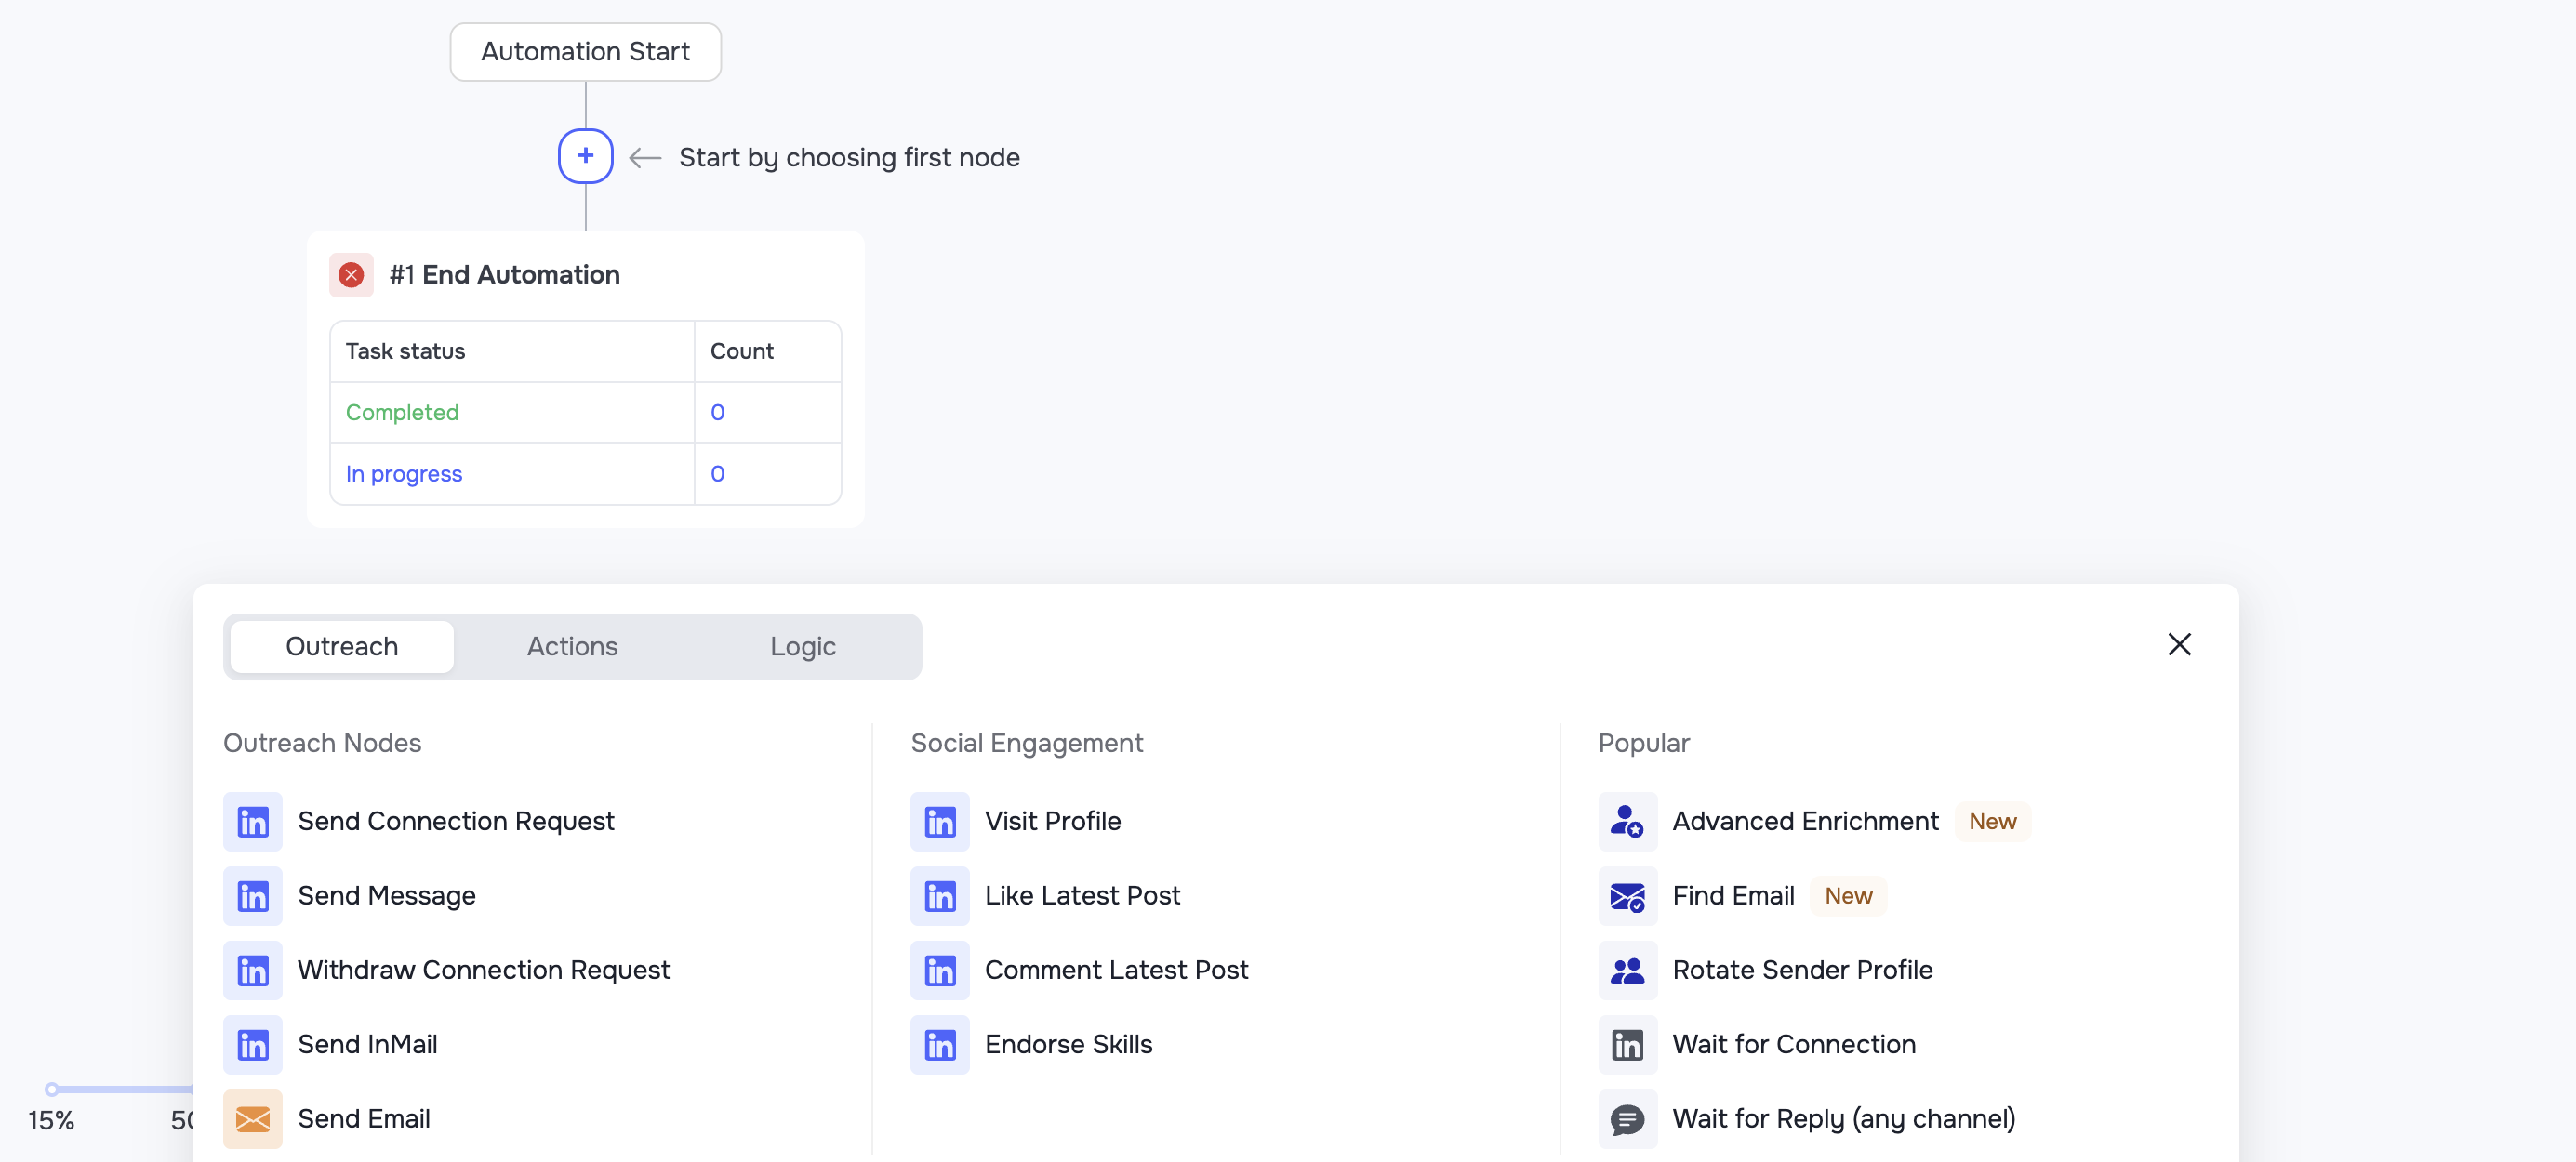
When you create an automation from scratch or edit a template, you work in the visual Builder. Every automation has a starting point (Automation Start) and an ending point (End Automation), and between them, a sequence of steps - nodes - is built in a "waterfall" layout.
To add a new node, click the + icon on the automation branch. In the modal window that appears, all nodes are split into three main tabs: Outreach, Actions, and Logic.
Basic node settings (Wait Period and Task Status)
Most nodes have common execution parameters when you add them:
-
Wait (Delay): You can set a waiting time (in days, hours, or minutes) before the system runs this node's task. The contact first goes through the set delay, and only after that is the task executed.
-
Execution mode: Tasks in a node can run fully automatically (Automatic) or in manual mode (Manual), which requires a check by the responsible user before sending.
🟢 Tip: Learn how manual tasks work in this article: [Working with Manual Tasks]
Outreach tab
This block contains the nodes responsible for directly establishing contact, sending messages, and social activity on recipients' profiles.
Send Connection Request
Send a request to contacts who are not part of your network (first-degree connections).
-
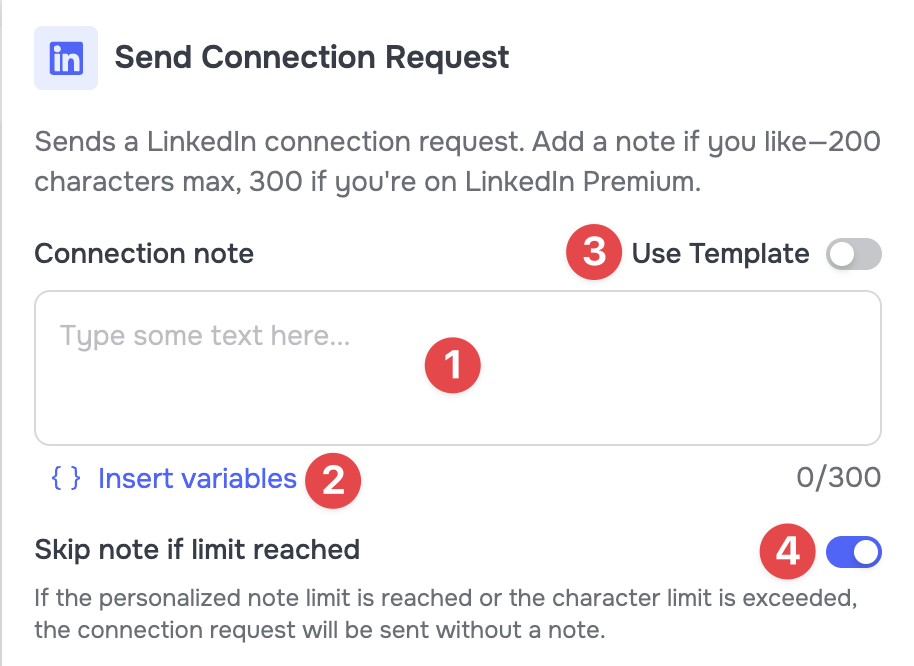
Optionally add text to your request (Connection note), or leave the text field (1) empty.
The maximum message length is set by LinkedIn: up to 200 characters for regular accounts and up to 300 characters for premium profiles. -
Optionally use the Insert Variables (2) function to personalize the message, or apply a prepared template with Use Template (3).
🟢 Tip: Keep the Skip note if limit reached (4) toggle enabled. If your profile runs out of the limit on personalized requests, the system will keep sending requests without a note, and the automation will not stop.
🟡 Note: Be sure to use the Wait for Connection trigger right after this node - it initiates a check of your request's status (Connected / Not Connected). Without the trigger, logical errors may occur in the automation. Read more about how triggers work below in this article, in the Wait triggers section.
Send Message
Send a message to contacts who have already accepted your request.
-
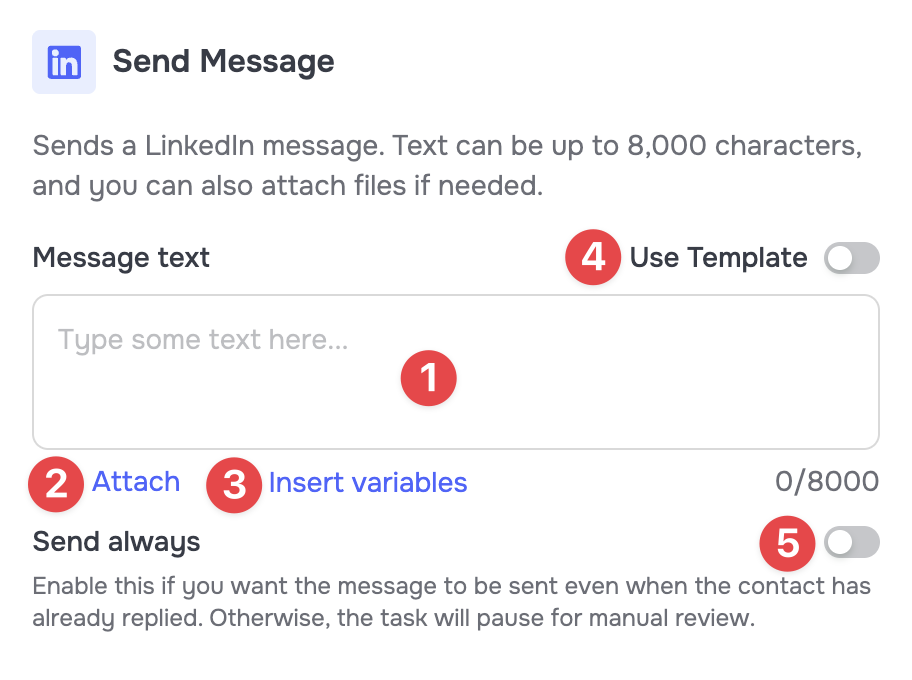
Add the message text in the text field (1) (maximum message length - 8000 characters).
-
Use Attach (2) to add files to the message (maximum file size - 20 MB)
-
Optionally use the Insert Variables (3) function to personalize the message, or apply a prepared template with Use Template (4).
-
The Send always (5) toggle, when disabled, stops the message from being sent if the contact has already replied. Enable the toggle if the message must be sent regardless of a reply or the Automation paused after reply status.
Withdraw Connection Request
Withdraw connection requests that have not been accepted.
🟡 Note: This function applies only to requests that have not been accepted. It is not possible to withdraw an already accepted request (that is, to remove a person from your connections). If the request has already been accepted by the time the contact reaches this node, the action will not be executed.
Send InMail
Send an InMail message (a LinkedIn premium feature for direct messaging).
-
Add the message subject in the Subject (1) field and the message text in the text field (2).
-
Use Attach (3) to add files to the message (maximum file size - 20 MB)
-
Optionally use the Insert Variables (4) function to personalize the message, or apply a prepared template with Use Template (5).
-
The Send always (6) toggle, when disabled, stops the message from being sent if the contact has already replied. Enable the toggle if the message must be sent regardless of a reply or the Automation paused after reply status.
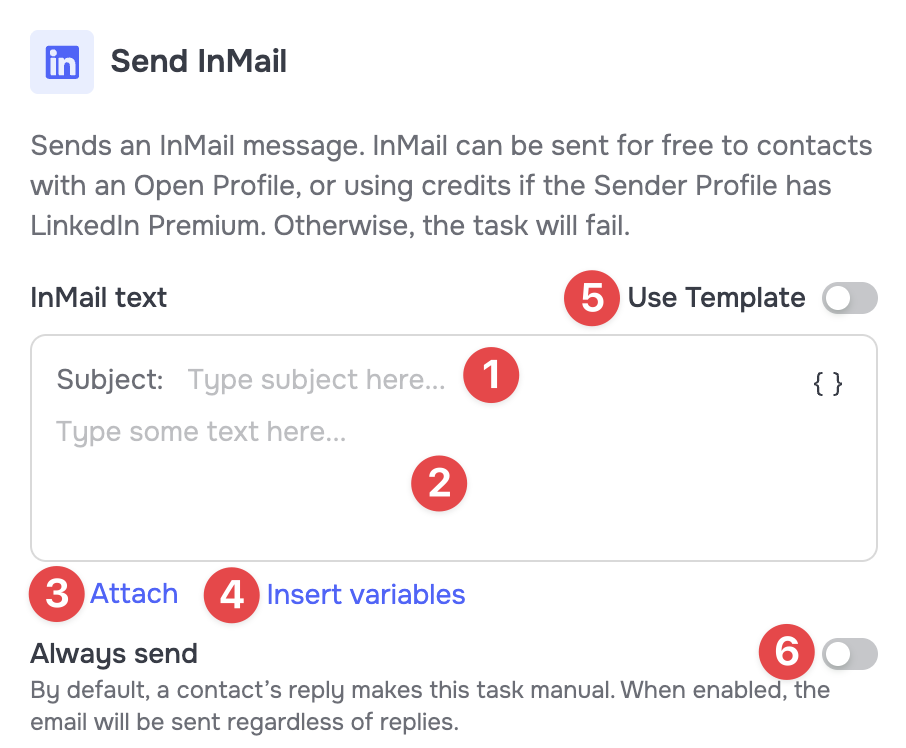
🟡 Note: InMails are only available for profiles with a LinkedIn premium subscription, or for profiles with the Open Profiles setting. For details on the conditions, logic, and limits, see this article: [InMails: How the Feature Works].
Send Email
Send an email in a general automation.
-
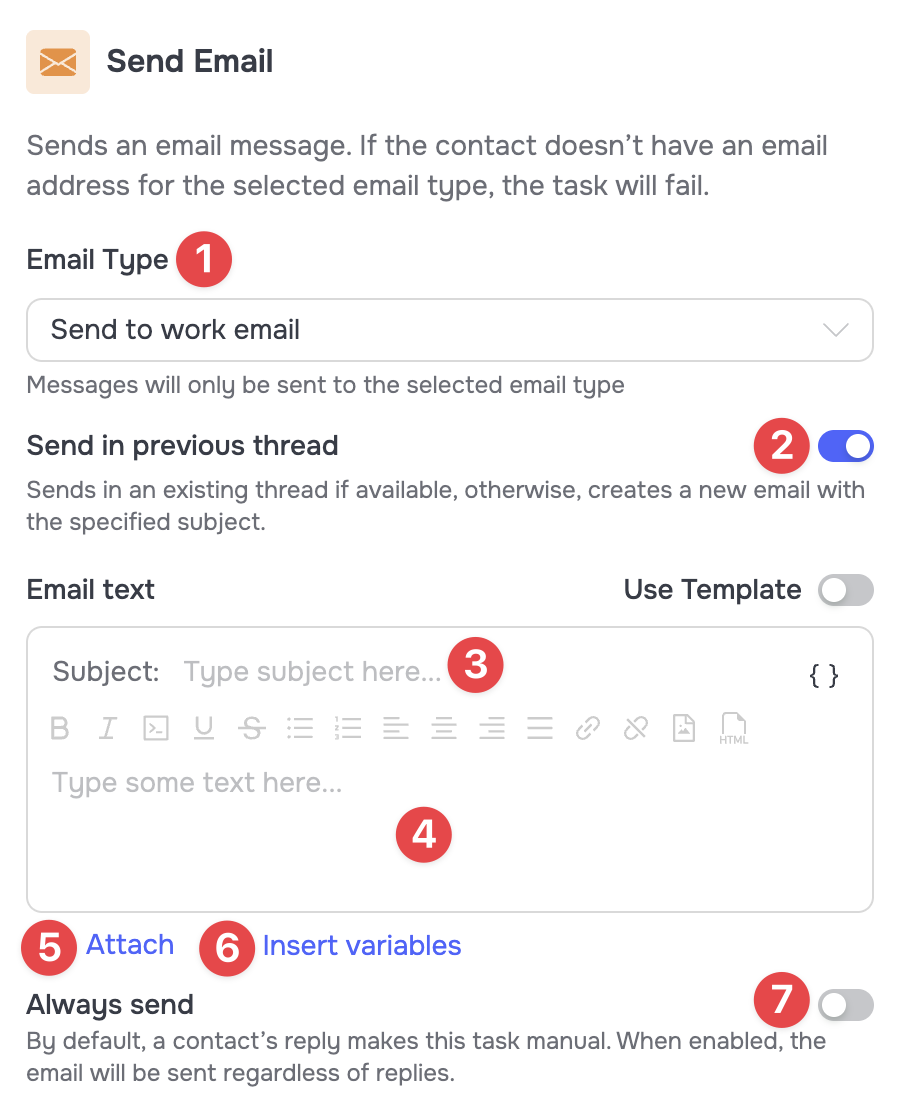
In the Email Type (1) field, choose the recipient's address type: work, personal, or any email
-
Enable the Send in previous thread (2) toggle to group emails into a single thread
🟡 Note: For the Send in previous thread function to work correctly, the subjects (Subject) in the current and previous email nodes must be identical, with an exact character match. -
Add the email subject in the Subject (3) field and the message text in the text field (4). If needed, add formatting elements to the text.
-
Use Attach (4) to add files to the message (maximum file size - 20 MB)
-
Optionally use the Insert Variables (5) function to personalize the message, or apply a prepared template with Use Template (6).
-
The Send always (7) toggle, when disabled, stops the message from being sent if the contact has already replied. Enable the toggle if the message must be sent regardless of a reply or the Automation paused after reply status.
Visit Profile
View the contact's page to draw their attention.
Like Latest Post
React to the user's latest post. If the user has no publications, the action will not be executed.
Comment Latest Post
Leave a comment on the user's latest post.
-
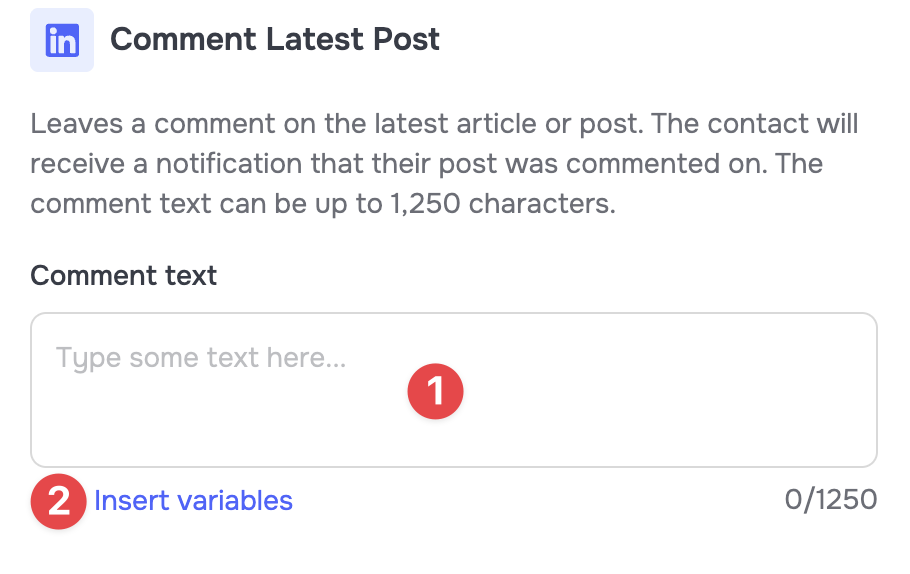
Add the comment text in the text field (1) (maximum message length - 1250 characters).
-
Optionally use the Insert Variables (2) function for personalization.
🟡 Note: The Comment Latest Post function only supports pre-written static text with the option to add variables. Automatic AI generation based on the post's content is currently not available.
Endorse Skills
Automatically endorse skills on the contact's profile. Choose the number of skills to endorse (1 by default).
🟢 Tip: LinkedIn only allows endorsing skills for first-degree connections. Use this node only after the contact has accepted your request, otherwise, it may cause logical errors in the automation.
Actions tab
The nodes in this tab are designed for automatically managing internal data, changing system attributes in the CRM, and configuring external integrations.
Advanced Enrichment
Force an out-of-turn update of the contact's data using information from LinkedIn.
Read more about how the function works and its related mechanics in this article: [Advanced Enrichment: How to Use].
Find Email
Find or verify work email addresses using integrated specialized services.
For setup and pricing instructions, see here: [How to Use the Find Email Node in Automations].
Rotate Sender Profile
Return the contact to the very beginning of the current automation, force a change of their sender profile and run through the automation sequence again.
🟡 Note: For the Rotate Sender Profile function to work correctly, set the Rotate to a new Sender Profile rule in the Leads distribution model section.
Detailed instructions for setting up rotation cycles are available here: [How to Set Up the Rotate Sender Profile Function].
API Call / Custom Webhook
Organize the import/export of contact or company data to external resources directly from the automation at a set step. Detailed setup instructions are available in these articles:
[How to Setup Webhook Call]
[How to Setup API Call]
Change Sender Profile
Change the current sender profile assigned to the contact and continue the automation for that contact with a different sender profile.
Change List
Automatically move the contact to another list inside your CRM.
Change Pipeline Stage
Change the contact's current pipeline stage (status) to another status you define.
Add Tag
Assign an internal tag to the contact's card.
Remove Tag
Remove the selected tag from the contact's card.
Send to Automation
Send the contact to another automation.
🟡 Note: Using this function does not cancel or stop the current automation for the contact. If the sequence of nodes continues after this function, the contact will keep going through them.
Logic tab
Use the nodes in this category to set up logical delays, run tests, and create conditional branches.
A/B Test
Split the flow of contacts into several parallel variations (A, B, C, D, etc). You can set any number of variants.
🟡 Note: Technically, this is simply a branching of the scenario into different branches. There are no restrictions on which nodes you can use in different branches: the nodes themselves and their order can differ in each branch.
Condition Rules
Create a branch in the automation based on the filtering criteria you set. This node checks whether the contact's parameters match the set requirements and directs them to the corresponding branch of the process. Within a single node, you can configure any number of independent rules for precise segmentation and routing of contacts inside the funnel.
AI Condition Rules
A filter that routes contacts across automation branches using AI. Instead of manually entering exact values, you simply describe the desired segments in plain language. The AI analyzes the contact profile, understands the context, and automatically determines the best match. Read more about setup details in the article: [AI Condition Rules: Sorting Contacts Using AI]
Time Delay
Apply a delay between nodes for a time you specify.
End Automation
Set the end of an automation branch for contacts who have gone through all the required steps.
Setting up action control triggers (Triggers)
Triggers are special nodes that check in real time whether a certain action has been taken by the contact (accepting a request or replying to a message) within a set time, and split the automation into two separate branches.
Available trigger types:
Wait for Connection
Used to check whether your connection request has been accepted. This trigger splits the automation into two branches:
-
Connected - the branch for contacts who accepted the request within the set time.
-
Not Connected - the branch for contacts who ignored the request during the specified period.
In each of these branches, you can continue building your own unique interaction scenario depending on the result.
🟡 Note: You must always place the Wait for Connection node right after the Send Connection Request node. If you do not add it to the sequence, the system will try to execute the following communication nodes (for example, send a message) without checking the request's status, which will lead to a system error.
Wait for Reply
Used to track feedback from the contact. In the Check reply to field, choose one of two reply detection modes: react only to the message that was sent last (Last reply message), or record any reply within the current conversation history (Any reply message). The trigger automatically splits the funnel into two branches:
-
Replied - the scenario for contacts who sent you a reply.
-
No Reply - the scenario for contacts from whom no response was received within the time set in Wait period.
General algorithm for setting up a trigger:
-
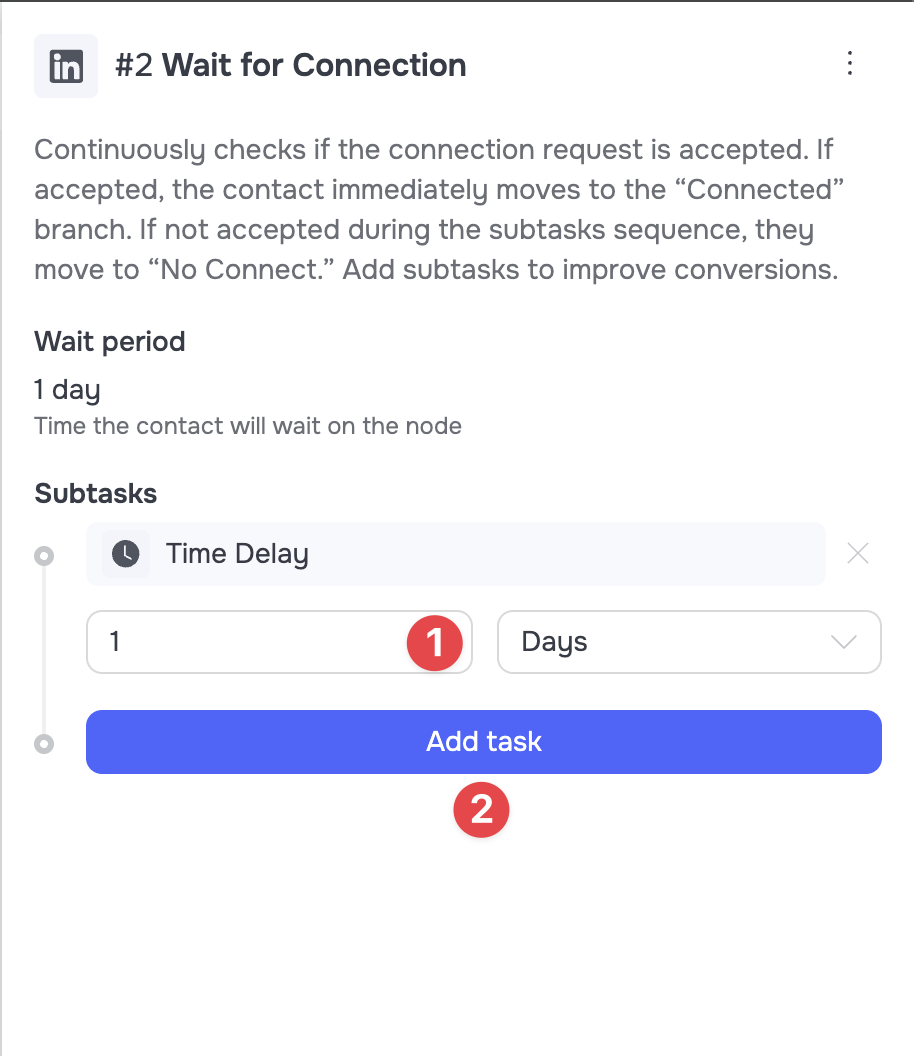
Setting the check time: In the Wait period (1) field, set the exact number of days, hours, or minutes during which the system will track the contact's action.
-
Setting up a subscenario (Subtasks): Optionally, you can build a separate internal subscenario inside the trigger. To do this, in the Subtasks block, click the Add task (2) button and choose the node you need (Time Delay, Visit Profile, Like / Comment Latest Post, Endorse skill).
🟡 Note: Any tasks inside the subscenario (Subtasks) are automatically cancelled if the contact performs the target action early, before the time set in the trigger runs out. At the moment the target action is recorded, execution of the subscenario stops, and the contact is immediately redirected to the corresponding automation branch.