The Automations section is the main tool for managing automated processes for interacting with contacts.
Main work screen and folder management
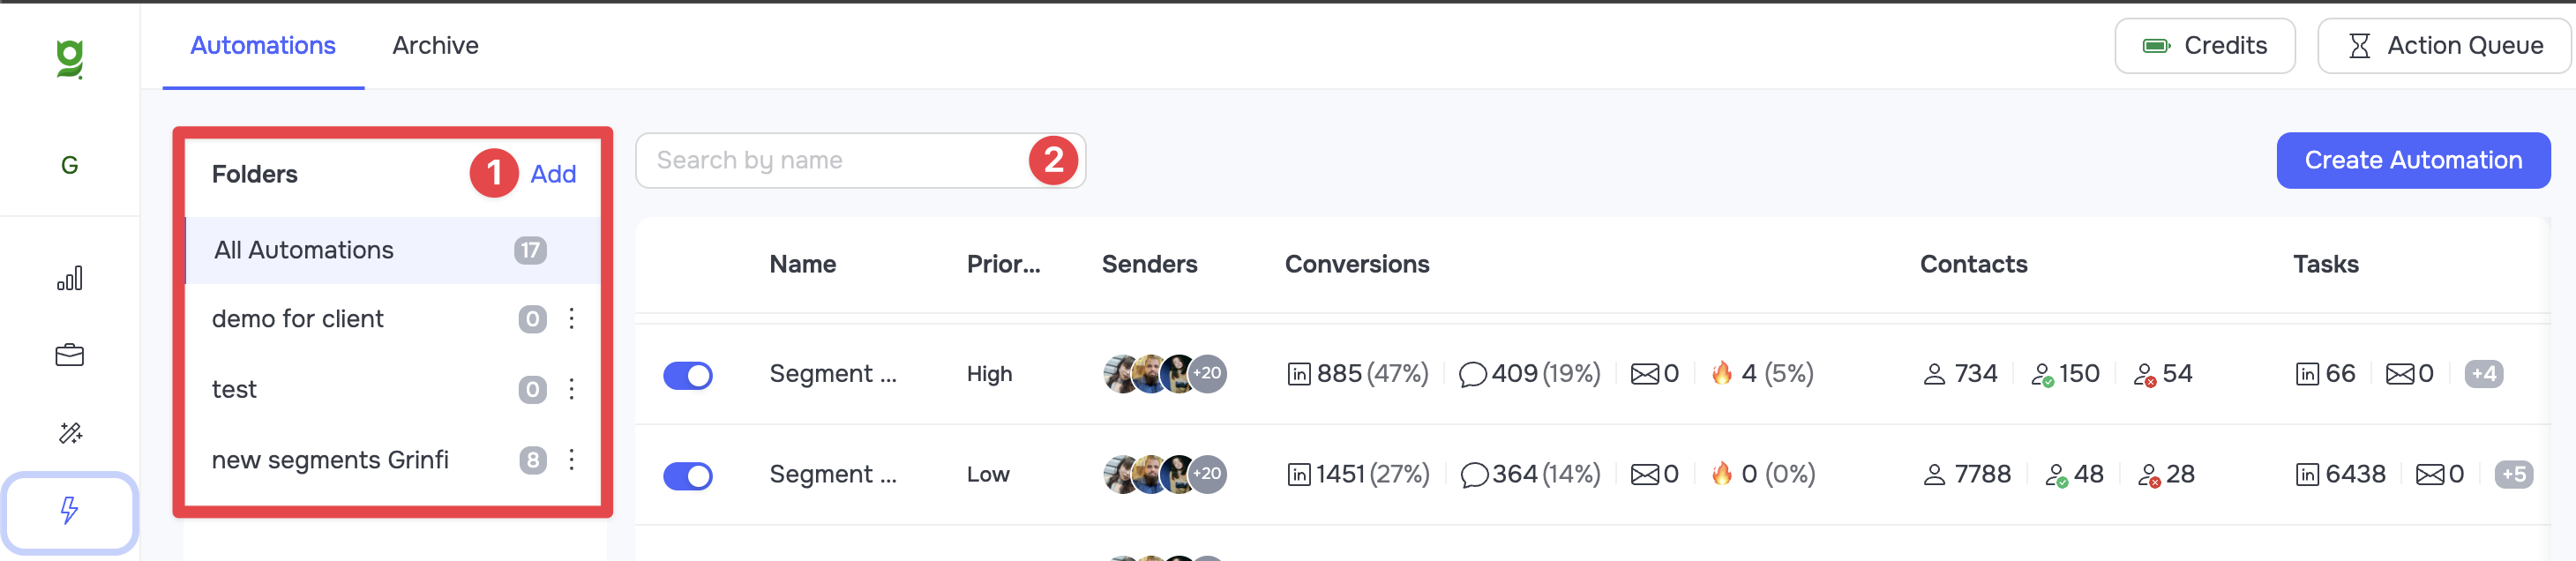
The main screen greets you with the folder management panel (Folders), which helps you structure and organize your automations.
-
Creating folders: To create a new folder, click the Add (1) button next to the folders panel. You can create any number of folders to conveniently sort your automations.
-
Search: Use the search bar (2) at the top of the screen to quickly find the automation you need by its name.
Main automation management menu
The central table shows all created automations. This table gives you quick access to managing and viewing statistics for each of them:
-
Status toggle: The toggle to the left of the name lets you instantly switch an automation from paused (Paused) to active (Active) and back.
-
Name: The name of your automation.
-
Priority: The automation's priority among the others.
-
Senders: The profiles involved in this automation.
-
Conversions: Overall conversion metrics. Hovering over this block opens a window with extended statistics.
-
Contacts: The number of contacts in the automation, broken down by status: In Progress, Finished, and Failed.
-
Tasks: The number of scheduled tasks. Hovering over this block opens a window with a detailed list of scheduled Tasks.
Additional actions ("..." menu)
Clicking the three-dot icon next to any automation opens the advanced options menu:

-
Builder: Go directly to the visual automation builder.
-
Config: Opens the settings window. Here you can change the name (Automation name), the storage folder (Folder), the priority (Automation Priority), and the automation's work schedule (by default, every automation uses the individual schedules of the senders. If you turn off the Use Sender Profile's Schedule toggle, you can set an individual schedule for the whole campaign).
🟡 Note: When setting an individual schedule, it must overlap with the schedules of the connected profiles. Without an overlap, the automation will not be able to start. Read more about this mechanic in the article [Sender Profile Work Schedule].
-
Clone: Creates an exact copy of an existing automation with all its settings and structure.
-
Share: Lets you share the automation. This feature generates a unique public link that you can pass on to other users (for example, to your team or to another workspace).
-
Archive: Moves the automation to the archive.
Automations archive
All processes you have moved to the archive are in the Archive tab (located next to the Automations tab on the top panel).
🟡 Note: It is not possible to delete an automation completely in the system. This is because contact cards permanently store the interaction history (which automations they took part in, which messages they received, and so on). To avoid breaking the integrity of the interaction history, automations that are no longer relevant can simply be moved to the archive.
Creating an automation
To start creating a new campaign, click the Create Automation button (located on the right in the general automations table).
The system will offer two options:
-
Use templates: Using ready-made templates.
-
Build manually: Building a unique automation yourself from scratch.
After choosing an option, you will go straight to the automation's internal work area.
The automation's internal work area
The automation's work area consists of two main tabs: Builder and Contacts.
Builder tab
This is the visual builder where the process logic is put together.
-
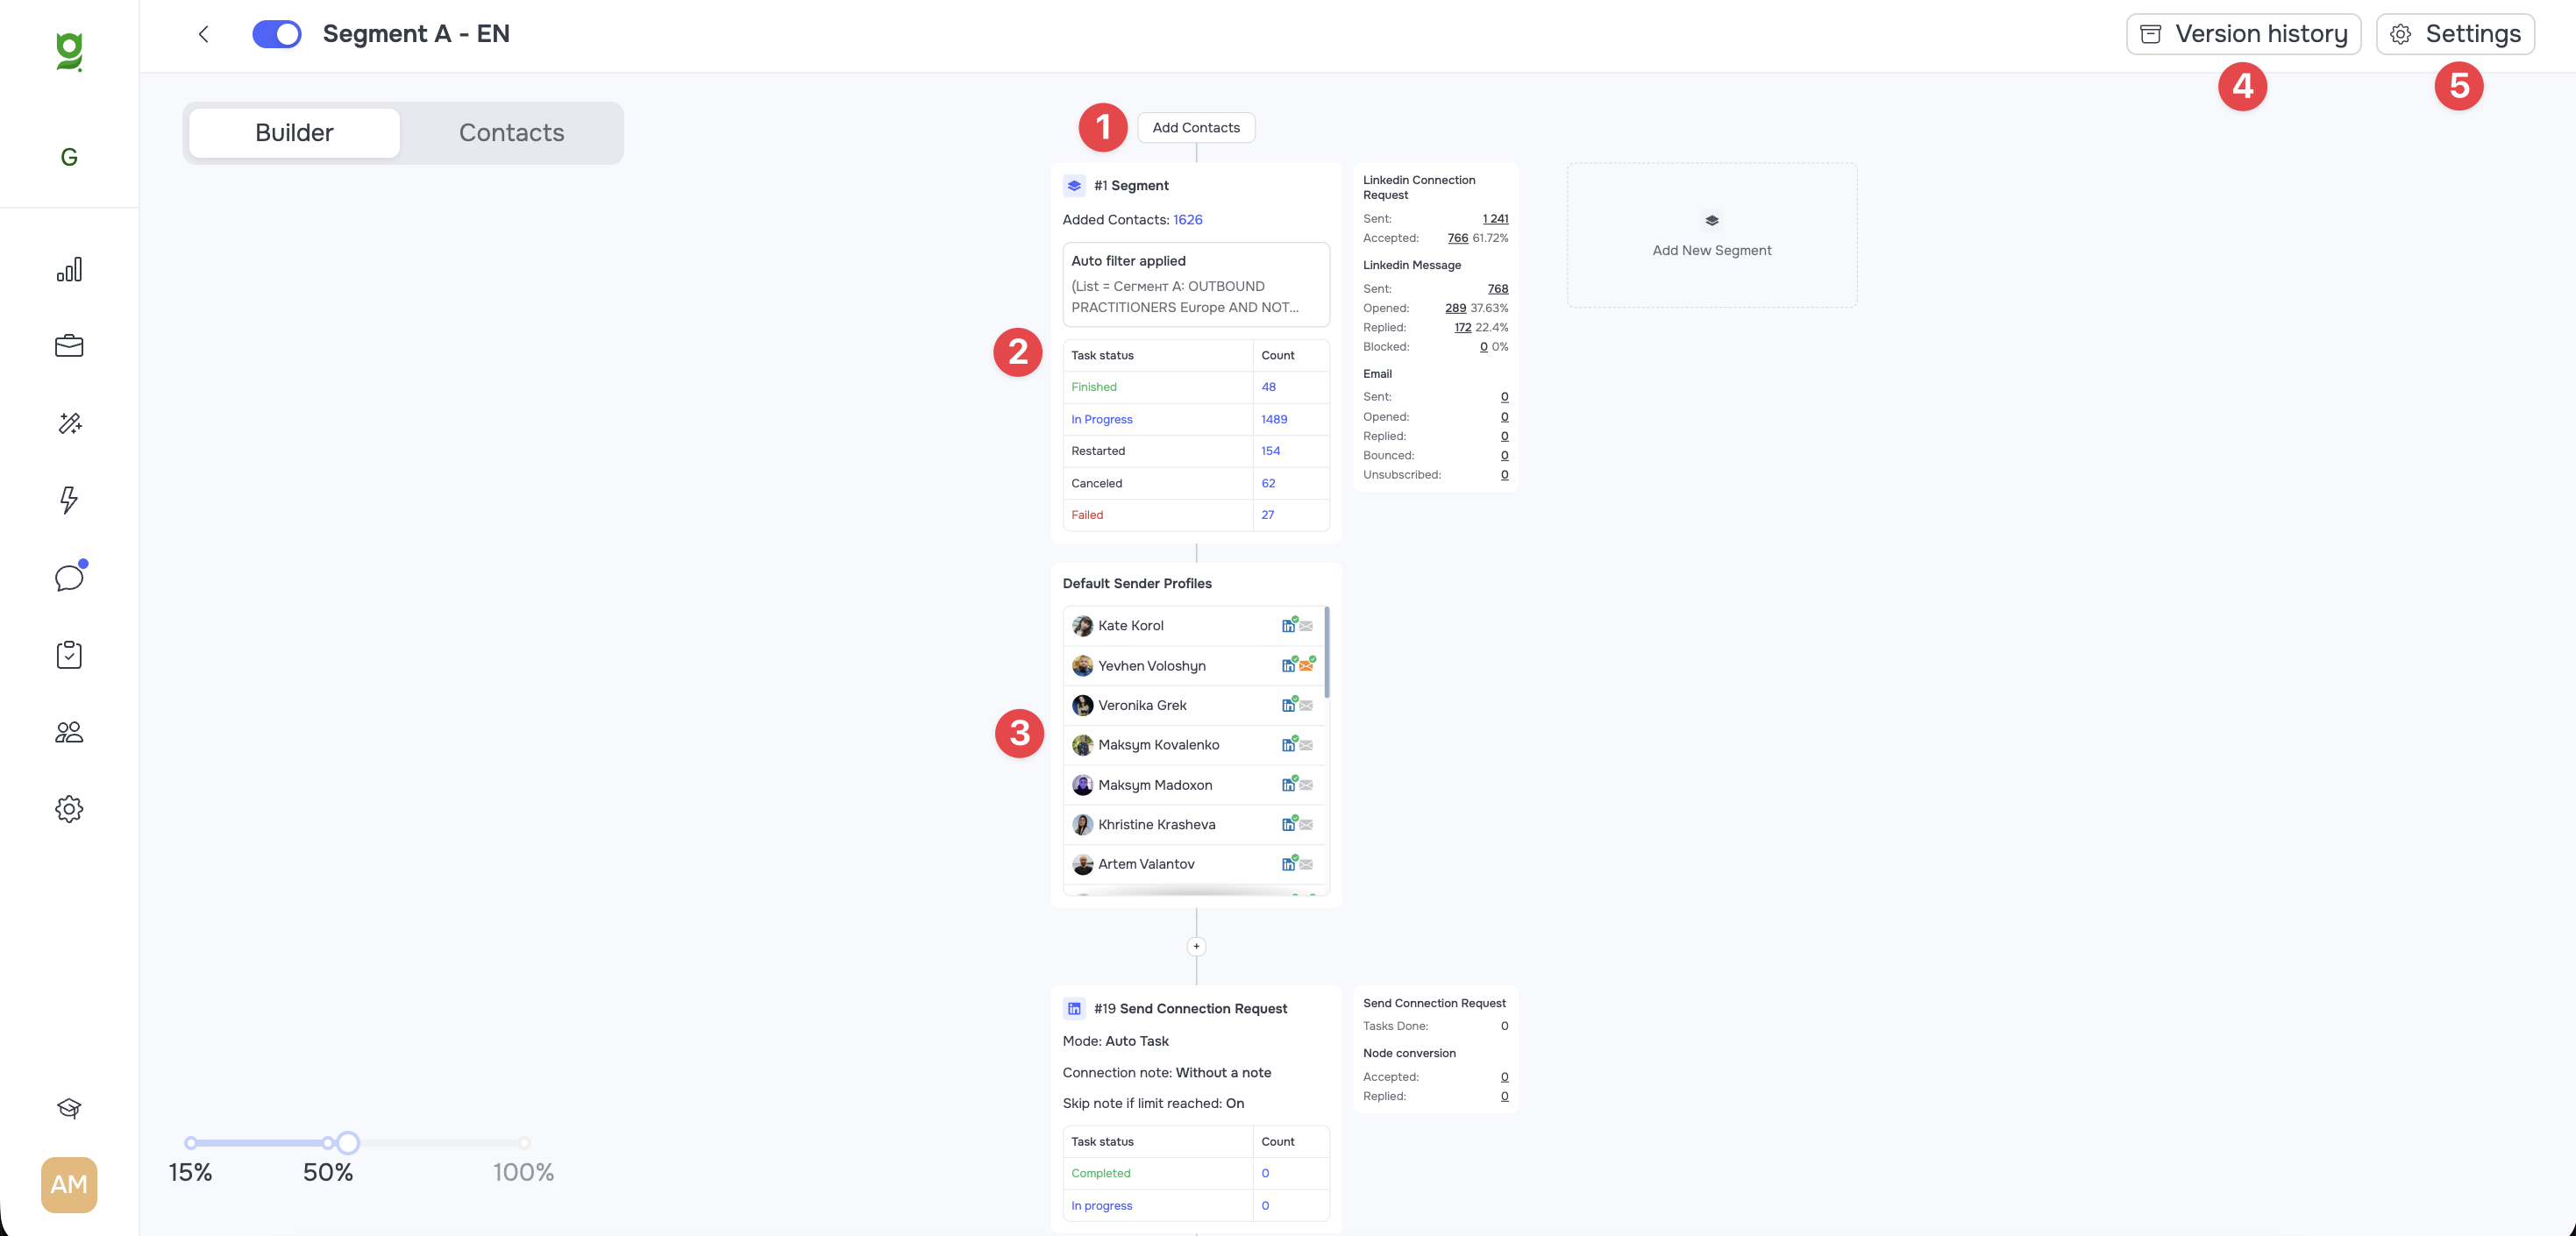
Add Contacts section (1): The top block, responsible for adding new contacts to this automation via the CRM widget.
-
Segment section (2): Shows the overall state of the automation, auto-filters (if any are applied), and statistics.
-
Default Sender Profiles section (3): Shows the sender profiles connected to the automation.
-
Node structure (Nodes): Below, the sequence of nodes (automation steps) is built. On each node, you can see detailed statistics: the number of contacts at this step, their statuses, and conversion metrics.
-
Version History (4): In the top-right corner, there is a version history button. It lets you view previously saved configurations of this automation (when and what changes were made).
-
Settings (5): Duplicates the schedule, priority, and folder settings described earlier.
Contacts tab
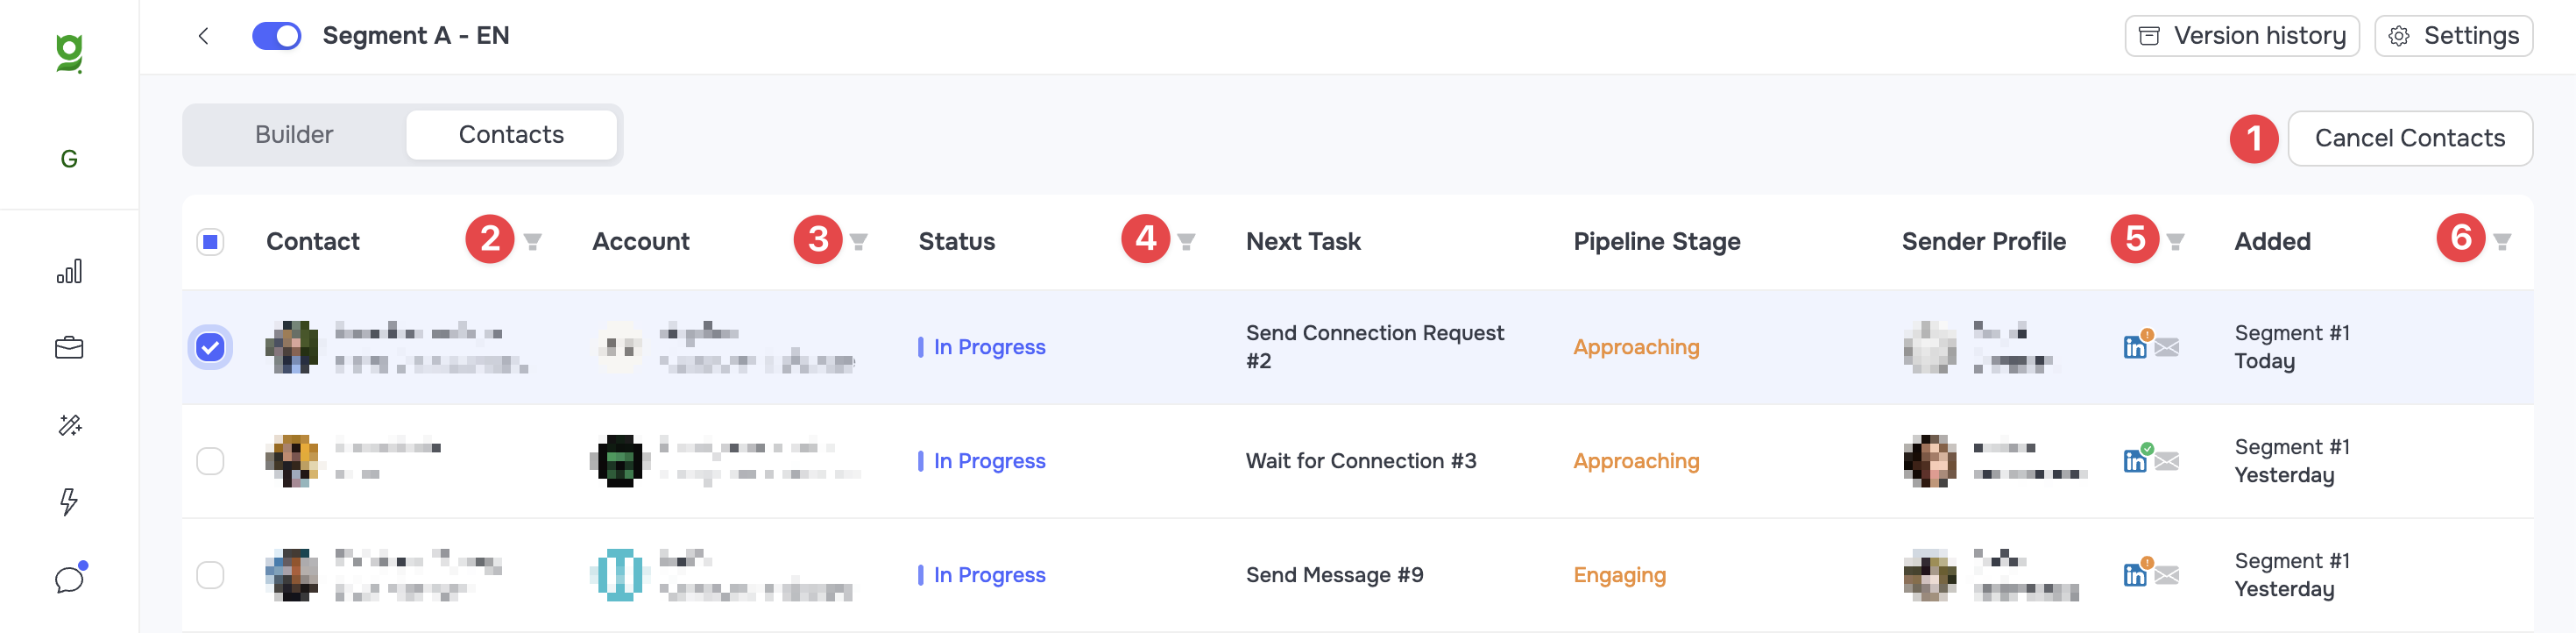
This tab holds a detailed table of all contacts that were or are participants in this automation. Here you can manage contacts and apply advanced filters (the funnel icon next to the column headers):
-
Cancel contacts (1) - removing contacts from the automation.
-
Contact (2) - filtering contacts by name.
-
Account (3) - filtering by company.
-
Status (4) - filtering by the current status in the automation.
-
Sender Profile (5) - filtering by the sender profile linked to a specific contact.
-
Added (6) - filtering by the date (date range) the contact was added to the automation.